Subtle Effect Bluegray Accent 5 Shape Style
You can change the look of a shape or text box by changing its fill or by adding effects to it, such as shadows, glows, reflections, soft edges, bevels, and three-dimensional (3-D) rotations.
A fill is a color, pattern, texture, picture, or gradient applied to the interior of a shape. A gradient is a gradual progression of colors and shades, usually from one color to another color, or from one shade to another shade of the same color.

Changing the fill color of a shape affects only the inside or front of the shape. If you add an effect to a shape, such as a shadow, and want a different color for that effect, you must change the color of the shadow separately from the fill color.
A 3-D effect adds depth to a shape. You can add a built-in combination of 3-D effects to your shape, or you can add individual effects. You can add combinations of individual effects to your shape in these programs: Excel, Outlook, Word, and PowerPoint.
Add a fill or effect
To add a fill or effect, click your shape, click Format, click the arrow next to Shape Fill or Shape Effects, and select a color, gradient, texture, or effect.
-
Click the shape that you want to fill. To add the same fill to multiple shapes, click the first shape, and then press and hold Ctrl while you click the other shapes.
-
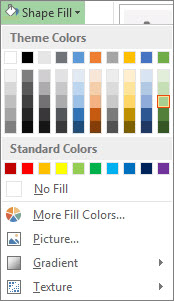
On the Format tab, in the Shape Styles group, click the arrow next to Shape Fill.
-
Do one of the following:
-
To add or change a fill color, click the color you want.
-
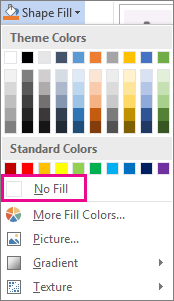
To choose no color, click No Fill.
-
To use a color that isn't one of the theme colors, click More Fill Colors, and then either click the color that you want on the Standard tab, or mix your own color on the Custom tab. Custom colors and colors on the Standard tab do not update if you later change the document theme.
-
To adjust the transparency of the shape, click More Fill Colors. At the bottom of the Colors dialog box, move the Transparency slider, or enter a number in the box next to the slider. You can vary the percentage of transparency from 0% (fully opaque, the default setting) to 100% (fully transparent).
-
To add or change a fill picture, click Picture, locate the folder that contains the picture that you want to use, click the picture file, and then click Insert.
-
To add or change a fill gradient, point to Gradient, and then click the gradient variation that you want. To customize the gradient, click More Gradients, and then choose the options that you want.
-
To add or change a fill texture, point to Texture, and then click the texture that you want. To customize the texture, click More Textures, and then choose the options that you want.
-
Top of page
For more information about adding a fill or effect, select an item from the drop-down list:
-
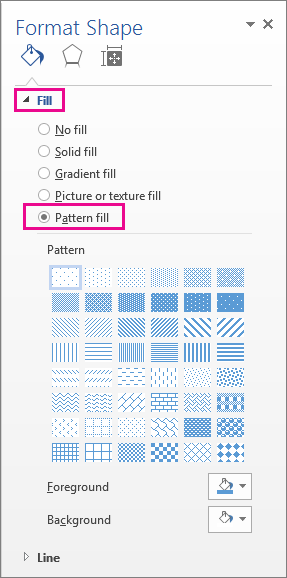
Right-click the shape that you want to add a pattern fill to and select Format Shape.
-
In the Format Shape pane, click Fill, and then click Pattern Fill.
-
Select a pattern, and if you like, click the arrows next to Foreground and Background and select a color combination.
Top of page
You can add a variety of effects to your text boxes and shapes, such as beveled edges or reflections.
-
Click the shape that you want to add an effect to. To add the same effect to multiple shapes, click the first shape, and then press and hold Ctrl while you click the other shapes.
-
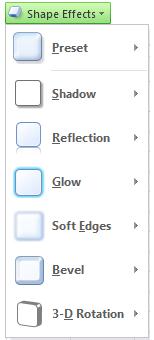
On the Format tab, in the Shape Styles group, click Shape Effects, and select an option from the list.
-
To add or change a built-in combination of effects, point to Preset, and then click the effect that you want.
To customize the built-in effect, click 3-D Options, and then choose the options that you want.
-
To add or change a shadow, point to Shadow, and then click the shadow that you want.
To customize the shadow, click Shadow Options, and then choose the options that you want.
-
To add or change a reflection, point to Reflection, and then click the reflection variation that you want.
To customize the reflection, click Reflection Options, and then choose the options that you want.
-
To add or change a glow, point to Glow, and then click the glow variation that you want.
To customize the glow, click Glow Options, and then choose the options that you want.
-
To add or change a soft edge, point to Soft Edges, and then click the size and color of the edge that you want.
To customize the soft edges, click Soft Edges Options, and then choose the options that you want.
-
To add or change an edge, point to Bevel, and then click the bevel that you want.
To customize the bevel, click 3-D Options, and then choose the options that you want.
-
To add or change a 3-D rotation, point to 3-D Rotation, and then click the rotation that you want.
To customize the rotation, click 3-D Rotation Options, and then choose the options that you want.
Notes:
-
To create a custom effect by adding multiple individual effects, repeat step two above.
-
If you add a 3-D effect, such as a bevel, to the shape and then add a soft edge, you will not see any visual change to the shape because the 3-D effect takes precedence. However, if you delete the 3-D effect, the soft edge effect will be visible.
-
-
Top of page
-
Click the shape that you want to delete a fill from. To delete the same fill from multiple shapes, click the first shape, and then press and hold Ctrl while you click the other shapes.
-
On the Format tab, in the Shape Styles group, click the arrow next to Shape Fill, and then click No Fill.
Top of page
-
Click the shape that you want to delete the effect from. To delete the same effect from multiple shapes, click the first shape, and then press and hold Ctrl while you click the other shapes.
-
On the Format tab, in the Shape Styles group, click Shape Effects, and then do one of the following.
-
To delete a built-in combination of effects from the shape, point to Preset, and then click No Presets.
Note:When you click No Presets, you do not remove any shadow effects that have been applied to your shape. To remove shadows on a shape, follow the step below.
-
To delete a shadow, point to Shadow, and then click No Shadow.
-
To delete a reflection, point to Reflection, and then click No Reflection.
-
To delete a glow, point to Glow, and then click No Glow.
-
To delete soft edges, point to Soft Edges, and then click No Soft Edges.
-
To delete an edge, point to Bevel, and then click No Bevel.
-
To delete 3-D rotation, point to 3-D Rotation, and then click No Rotation.
-
Note:If you have added multiple individual effects, repeat step two above to delete all the effects.
Top of page
See also
-
To add a shape, see Add shapes.
-
To learn about other shapes with effects, see Insert WordArt or Learn more about SmartArt graphics.
-
To change the look of a picture, see Apply an artistic effect to a picture.
-
To change the look of a text box, see Change the colors in a text box or shape.
-
To change the border around a text box or shape, see Remove or change the border on a text box or shape.
-
To create a moving effect in PowerPoint, see Animate text or objects.
Add or change a shape fill
-
Click the shape that you want to add a fill to.
To add the same fill to multiple shapes, click the first shape, and then press and hold CTRL while you click the other shapes.
-
Under Drawing Tools, on the Format tab, in the Shape Styles group, click the arrow next to Shape Fill, and then do one of the following:

If you do not see the Drawing Tools or Format tabs, make sure that you have selected the shape. You might have to double-click the shape to open the Format tab.
-
To add or change a fill color, click the color that you want, or to choose no color, click No Fill.
To change to a color that is not in the theme colors, click More Fill Colors, and then either click the color that you want on the Standard tab, or mix your own color on the Custom tab. Custom colors and colors on the Standard tab do not update if you later change the document theme.
Tip:You can also adjust the transparency of the shape by clicking More Fill Colors. At the bottom of the Colors dialog box, move the Transparency slider, or enter a number in the box next to the slider. You can vary the percentage of transparency from 0% (fully opaque, the default setting) to 100% (fully transparent).
-
To add or change a fill picture, click Picture, locate the folder that contains the picture that you want to use, click the picture file, and then click Insert.
-
To add or change a fill gradient, point to Gradient, and then click the gradient variation that you want.
To customize the gradient, click More Gradients, and then choose the options that you want.
-
To add or change a fill texture, point to Texture, and then click the texture that you want.
To customize the texture, click More Textures, and then choose the options that you want.
-
Top of page
For more information about adding a fill or effect, select an item from the drop-down list.
-
Right-click the shape that you want to add a pattern fill to and select Format Shape.
-
In the Format Shape dialog box, click the Fill tab.
-
In the Fill pane, select Pattern fill and then select a pattern, foreground color, and background color for your pattern fill.
Top of page
-
Click the shape that you want to add an effect to.
To add the same effect to multiple shapes, click the first shape, and then press and hold CTRL while you click the other shapes.
-
Under Drawing Tools, on the Format tab, in the Shape Styles group, click Shape Effects, and then do one of the following:
If you do not see the Drawing Tools or Format tabs, make sure that you have selected the shape. You might have to double-click the shape to open the Format tab.
-
To add or change a built-in combination of effects, point to Preset, and then click the effect that you want.
To customize the built-in effect, click 3-D Options, and then choose the options that you want.
-
To add or change a shadow, point to Shadow, and then click the shadow that you want.
To customize the shadow, click Shadow Options, and then choose the options that you want.
-
To add or change a reflection, point to Reflection, and then click the reflection variation that you want.
To customize the reflection, click Reflection Options, and then choose the options that you want.
-
To add or change a glow, point to Glow, and then click the glow variation that you want.
To customize the glow, click Glow Options, and then choose the options that you want.
-
To add or change a soft edge, point to Soft Edges, and then click the size and color of the edge that you want.
To customize the soft edges, click Soft Edges Options, and then choose the options that you want.
-
To add or change an edge, point to Bevel, and then click the bevel that you want.
To customize the bevel, click 3-D Options, and then choose the options that you want.
-
To add or change a 3-D rotation, point to 3-D Rotation, and then click the rotation that you want.
To customize the rotation, click 3-D Rotation Options, and then choose the options that you want.
Notes:
-
To create a custom effect by adding multiple individual effects, repeat step two above.
-
If you add a 3-D effect, such as a bevel, to the shape and then add a soft edge, you will not see any visual change to the shape because the 3-D effect takes precedence. However, if you delete the 3-D effect, the soft edge effect will be visible.
-
-
Top of page
-
Click the shape that you want to delete a fill from.
To delete the same fill from multiple shapes, click the first shape, and then press and hold CTRL while you click the other shapes.
-
Under Drawing Tools, on the Format tab, in the Shapes Styles group, click the arrow next to Shape Fill, and then click No Fill.
If you do not see the Drawing Tools or Format tabs, make sure that you have selected the shape. You might have to double-click the shape to open the Format tab.
Top of page
-
Click the shape that you want to delete the effect from.
To delete the same effect from multiple shapes, click the first shape, and then press and hold CTRL while you click the other shapes.
-
Under Drawing Tools, on the Format tab, in the Shape Styles group, click Shape Effects, and then do one of the following:
If you do not see the Drawing Tools or Format tabs, make sure that you have selected the shape. You might have to double-click the shape to open the Format tab.
-
To delete a built-in combination of effects from the shape, point to Preset, and then click No Presets.
Note:When you click No Presets, you do not remove any shadow effects that have been applied to your shape. To remove shadows on a shape, follow the step below.
-
To delete a shadow from the shape, point to Shadow, and then click No Shadow.
-
To delete a reflection from the shape, point to Reflection, and then click No Reflection.
-
To delete a glow from the shape, point to Glow, and then click No Glow.
-
To delete soft edges from the shape, point to Soft Edges, and then click No Soft Edges.
-
To delete an edge from the shape, point to Bevel, and then click No Bevel.
-
To delete 3-D rotation from the shape, point to 3-D Rotation, and then click No Rotation.
-
Note:If you have added multiple individual effects, repeat step two above to delete all the effects.
Top of page
Add or change a fill
Select a Microsoft Office application from the drop-down list.
-
Click the shape or text box that you want to add a fill to.
To add the same fill to multiple shapes or text boxes, click the first one, and then press and hold SHIFT while you click the others.
-
Under Drawing Tools, on the Format tab, in the Shape Styles group, click Shape Fill, and then do one of the following:

-
To add or change a fill color, click the color that you want, or to choose no color, click No Fill.
To change to a color that is not in the theme colors, click More Fill Colors, and then either click the color that you want on the Standard tab, or mix your own color on the Custom tab. Custom colors and colors on the Standard tab do not update if you later change the document theme.
You can also adjust the transparency of the fill by clicking More Fill Colors. At the bottom of the Colors dialog box, move the Transparency slider, or enter a number in the box next to the slider. You can vary the percentage of transparency from 0% (fully opaque, the default setting) to 100% (fully transparent).
-
To add or change a fill picture, click Picture, locate and click the picture that you want to use, and then click Insert.
-
To add or change a fill gradient, point to Gradient, and then click the gradient variation that you want.
To customize the gradient, click More Gradients, and then choose the options that you want.
-
To add or change a fill texture, point to Texture, and then click the texture that you want.
To customize the texture, click More Textures, and then choose the options that you want.
-
Top of page
-
Click the shape or text box that you want to add a fill to.
To add the same fill to multiple shapes or text boxes, click the first one, and then press and hold SHIFT while you click the others.
-
Under Drawing Tools or Text Box Tools, on the Format tab, in the Shape Styles or Text Box Styles group, click Shape Fill, and then do one of the following:

-
To add or change a fill color, click the color that you want, or to choose no color, click No Fill.
To change to a color that is not in the theme colors, click More Fill Colors, and then either click the color that you want on the Standard tab, or mix your own color on the Custom tab. Custom colors and colors on the Standard tab do not update if you later change the document theme.
You can also adjust the transparency by clicking More Fill Colors. At the bottom of the Colors dialog box, move the Transparency slider, or enter a number in the box next to the slider. You can vary the percentage of transparency from 0% (fully opaque, the default setting) to 100% (fully transparent).
-
To add or change a fill picture, click Picture, locate the folder that contains the picture that you want to use, click the picture file, and then click Insert.
-
To add or change a fill gradient, point to Gradient, and then click the gradient variation that you want.
To customize the gradient, click More Gradients, and then choose the options that you want.
-
To add or change a fill texture, point to Texture, and then click the texture that you want.
To customize the texture, click More Textures, and then choose the options that you want.
-
To add or change a pattern, click Pattern, and then click the options that you want.
-
Top of page
-
Click the shape or text box that you want to add a fill to.
To add the same fill to multiple shapes or text boxes, click the first one, and then press and hold SHIFT while you click the others.
-
Under Drawing Tools, on the Format tab, in the Shape Styles group, click Shape Fill, and then do one of the following:
-
To add or change a fill color, click the color that you want, or to choose no color, click No Fill.
To change to a color that is not in the theme colors, click More Fill Colors, and then either click the color that you want on the Standard tab, or mix your own color on the Custom tab. Custom colors and colors on the Standard tab do not update if you later change the document theme.
You can also adjust the transparency of the fill by clicking More Fill Colors. At the bottom of the Colors dialog box, move the Transparency slider, or enter a number in the box next to the slider. You can vary the percentage of transparency from 0% (fully opaque, the default setting) to 100% (fully transparent).
-
To add or change a fill picture, click Picture, locate and click the picture that you want to use, and then click Insert.
-
To add or change a fill gradient, point to Gradient, and then click the gradient variation that you want.
To customize the gradient, click More Gradients, and then choose the options that you want.
-
To add or change a fill texture, point to Texture, and then click the texture that you want.
To customize the texture, click More Textures, and then choose the options that you want.
-
Top of page
-
Click the shape or text box that you want to add a fill to.
To add the same fill to multiple shapes or text boxes, click the first one, and then press and hold SHIFT while you click the others.
-
Under Drawing Tools or Text Box Tools, on the Format tab, in the Shape Styles or Text Box Styles group, click Shape Fill, and then do one of the following:
-
To add or change a fill color, click the color that you want, or to choose no color, click No Fill.
To change to a color that is not in the theme colors, click More Fill Colors, and then either click the color that you want on the Standard tab, or mix your own color on the Custom tab. Custom colors and colors on the Standard tab do not update if you later change the document theme.
You can also adjust the transparency by clicking More Fill Colors. At the bottom of the Colors dialog box, move the Transparency slider, or enter a number in the box next to the slider. You can vary the percentage of transparency from 0% (fully opaque, the default setting) to 100% (fully transparent).
-
To add or change a fill picture, click Picture, locate the folder that contains the picture that you want to use, click the picture file, and then click Insert.
-
To add or change a fill gradient, point to Gradient, and then click the gradient variation that you want.
To customize the gradient, click More Gradients, and then choose the options that you want.
-
To add or change a fill texture, point to Texture, and then click the texture that you want.
To customize the texture, click More Textures, and then choose the options that you want.
-
To add or change a pattern, click Pattern, and then click the options that you want.
-
Top of page
Add or change an effect
Select a Microsoft Office application from the drop-down list.
-
Click the shape or text box that you want to add an effect to.
To add the same effect to multiple shapes or text boxes, click the first one, and then press and hold SHIFT while you click the others.
-
Under Drawing Tools, on the Format tab, in the Shape Styles group, click Shape Effects, and then do one of the following:
-
To add or change a built-in combination of effects, point to Preset, and then click the effect that you want.
To customize the built-in effect, click 3-D Options, and then choose the options that you want.
-
To add or change a shadow, point to Shadow, and then click the shadow that you want.
To customize the shadow, click Shadow Options, and then choose the options that you want.
-
To add or change a reflection, point to Reflection, and then click the reflection variation that you want.
-
To add or change a glow, point to Glow, and then click the glow variation that you want.
To customize the glow colors, click More Glow Colors, and then choose the color that you want. To change to a color that is not in the theme colors, click More Colors, and then either click the color that you want on the Standard tab, or mix your own color on the Custom tab. Custom colors and colors on the Standard tab do not update if you later change the document theme.
-
To add or change a soft edge, point to Soft Edges, and then click the size of the edge that you want.
-
To add or change an edge, point to Bevel, and then click the bevel that you want.
To customize the bevel, click 3-D Options, and then choose the options that you want.
-
To add or change a 3-D rotation, point to 3-D Rotation, and then click the rotation that you want.
To customize the rotation, click 3-D Rotation Options, and then choose the options that you want.
Notes:
-
To create a custom effect by adding multiple individual effects, repeat step two above.
-
If you add a 3-D effect, such as a bevel or 3-D rotation, and then add a soft edge, you will not see any change to the shape or text box because the 3-D effect takes precedence. However, if you delete the 3-D effect, the soft edge effect is visible.
-
-
Top of page
-
Click the shape or text box that you want to add an effect to.
To add the same effect to multiple shapes or text boxes, click the first one, and then press and hold SHIFT while you click the others.
-
Under Drawing Tools or Text Box Tools, on the Format tab, in the Shape Styles or Text Box Styles group, click Shape Fill, and then do one of the following:
-
To add or change a shadow, in the Shadow Effects group, click Shadow Effects, and then choose the shadow that you want.
To customize the shadow color, point to Shadow Color, and then click the color that you want.
To change to a color that is not in the theme colors, click More Shadow Colors, and then either click the color that you want on the Standard tab, or mix your own color on the Custom tab. Custom colors and colors on the Standard tab do not update if you later change the document theme.
-
To add or change a 3-D effect, in the 3-D Effects group, click 3-D Effects, and then choose the options that you want.
-
Top of page
-
Click the shape or text box that you want to add an effect to.
To add the same effect to multiple shapes or text boxes, click the first one, and then press and hold SHIFT while you click the others.
-
Under Drawing Tools, on the Format tab, in the Shape Styles group, click Shape Effects, and then do one of the following:
-
To add or change a built-in combination of effects, point to Preset, and then click the effect that you want.
To customize the built-in effect, click 3-D Options, and then choose the options that you want.
-
To add or change a shadow, point to Shadow, and then click the shadow that you want.
To customize the shadow, click Shadow Options, and then choose the options that you want.
-
To add or change a reflection, point to Reflection, and then click the reflection variation that you want.
-
To add or change a glow, point to Glow, and then click the glow variation that you want.
To customize the glow colors, click More Glow Colors, and then choose the color that you want. To change to a color that is not in the theme colors, click More Colors, and then either click the color that you want on the Standard tab, or mix your own color on the Custom tab. Custom colors and colors on the Standard tab do not update if you later change the document theme.
-
To add or change a soft edge, point to Soft Edges, and then click the size of the edge that you want.
-
To add or change an edge, point to Bevel, and then click the bevel that you want.
To customize the bevel, click 3-D Options, and then choose the options that you want.
-
To add or change a 3-D rotation, point to 3-D Rotation, and then click the rotation that you want.
To customize the rotation, click 3-D Rotation Options, and then choose the options that you want.
Notes:
-
To create a custom effect by adding multiple individual effects, repeat step two above.
-
If you add a 3-D effect, such as a bevel or 3-D rotation, and then add a soft edge, you will not see any change to the shape or text box because the 3-D effect takes precedence. However, if you delete the 3-D effect, the soft edge effect is visible.
-
-
Top of page
-
Click the shape or text box that you want to add an effect to.
To add the same effect to multiple shapes or text boxes, click the first one, and then press and hold SHIFT while you click the others.
-
Under Drawing Tools or Text Box Tools, on the Format tab, in the Shape Styles or Text Box Styles group, click Shape Fill, and then do one of the following:
-
To add or change a shadow, in the Shadow Effects group, click Shadow Effects, and then choose the shadow that you want.
To customize the shadow color, point to Shadow Color, and then click the color that you want.
To change to a color that is not in the theme colors, click More Shadow Colors, and then either click the color that you want on the Standard tab, or mix your own color on the Custom tab. Custom colors and colors on the Standard tab do not update if you later change the document theme.
-
To add or change a 3-D effect, in the 3-D Effects group, click 3-D Effects, and then choose the options that you want.
-
Top of page
Delete a fill
Select a Microsoft Office application from the drop-down list.
-
Click the shape or text box that you want to delete a fill from.
To delete the same fill from multiple shapes or text boxes, click the first one, and then press and hold SHIFT while you click the others.
-
Under Drawing Tools, on the Format tab, in the Shape Styles group, click Shape Fill, and then click No Fill.
Top of page
-
Click the shape or text box that you want to delete a fill from.
To delete the same fill from multiple shapes or text boxes, click the first one, and then press and hold SHIFT while you click the others.
-
Under Drawing Tools or Text Box Tools, on the Format tab, in the Shape Styles or Text Box Styles group, click Shape Fill, and then click No Fill.

Top of page
-
Click the shape or text box that you want to delete a fill from.
To delete the same fill from multiple shapes or text boxes, click the first one, and then press and hold SHIFT while you click the others.
-
Under Drawing Tools, on the Format tab, in the Shape Styles group, click Shape Fill, and then click No Fill.
Top of page
-
Click the shape or text box that you want to delete a fill from.
To delete the same fill from multiple shapes or text boxes, click the first one, and then press and hold SHIFT while you click the others.
-
Under Drawing Tools or Text Box Tools, on the Format tab, in the Shape Styles or Text Box Styles group, click Shape Fill, and then click No Fill.
Top of page
Delete an effect
Select a Microsoft Office application from the drop-down list.
-
Click the shape or text box that you want to delete the effect from.
To delete the same effect from multiple shapes or text boxes, click the first one, and then press and hold SHIFT while you click the others.
-
Under Drawing Tools, on the Format tab, in the Shape Styles group, click Shape Effects, and then do one of the following:
-
To delete a built-in combination of effects, point to Preset, and then click No Presets.
-
To delete a shadow, point to Shadow, and then click No Shadow.
-
To delete a reflection, point to Reflection, and then click No Reflection.
-
To delete a glow, point to Glow, and then click No Glow.
-
To delete soft edges, point to Soft Edges, and then click No Soft Edges.
-
To delete an edge, point to Bevel, and then click No Bevel.
-
To delete 3-D rotation, point to 3-D Rotation, and then click No Rotation.
-
To delete multiple individual effects, repeat step two above.
Top of page
-
Click the shape or text box that you want to delete the effect from.
To delete the same effect from multiple shapes or text boxes, click the first one, and then press and hold SHIFT while you click the others.
-
Under Drawing Tools or Text Box Tools, on the Format tab, do one of the following:
-
To delete a shadow, in the Shadow Effects group, click Shadow Effects, and then click No Shadow Effect.
-
To delete a 3-D effect, in the 3-D Effects group, click 3-D Effects, and then click No 3-D Effect.
-
Note:If you do not see the Drawing Tools, Text Box Tools, or Format tabs, make sure that you clicked the shape or text box.
Top of page
-
Click the shape or text box that you want to delete the effect from.
To delete the same effect from multiple shapes or text boxes, click the first one, and then press and hold SHIFT while you click the others.
-
Under Drawing Tools, on the Format tab, in the Shape Styles group, click Shape Effects, and then do one of the following:
-
To delete a built-in combination of effects, point to Preset, and then click No Presets.
-
To delete a shadow, point to Shadow, and then click No Shadow.
-
To delete a reflection, point to Reflection, and then click No Reflection.
-
To delete a glow, point to Glow, and then click No Glow.
-
To delete soft edges, point to Soft Edges, and then click No Soft Edges.
-
To delete an edge, point to Bevel, and then click No Bevel.
-
To delete 3-D rotation, point to 3-D Rotation, and then click No Rotation.
-
To delete multiple individual effects, repeat step two above.
Top of page
-
Click the shape or text box that you want to delete the effect from.
To delete the same effect from multiple shapes or text boxes, click the first one, and then press and hold SHIFT while you click the others.
-
Under Drawing Tools or Text Box Tools, on the Format tab, do one of the following:
-
To delete a shadow, in the Shadow Effects group, click Shadow Effects, and then click No Shadow Effect.
-
To delete a 3-D effect, in the 3-D Effects group, click 3-D Effects, and then click No 3-D Effect.
-
Note:If you do not see the Drawing Tools, Text Box Tools, or Format tabs, make sure that you clicked the shape or text box.
Top of page
Source: https://support.microsoft.com/en-us/office/add-a-fill-or-effect-to-a-shape-or-text-box-28d8dc7f-5bc2-4f83-bb07-615f84ca77d1
0 Response to "Subtle Effect Bluegray Accent 5 Shape Style"
Post a Comment